Installation Guide
This page guides administrators through production deployment and validation of OpenBook. It covers the required components, supported web-server setups, and the routine operational tasks needed to keep an installation stable, secure, and maintainable.
Quick Start
System Overview
OpenBook is a standard Django deployment with a few project-specific considerations. The general deployment process follows the Django documentation. This page focuses on the concrete parts that matter when you run OpenBook in production.
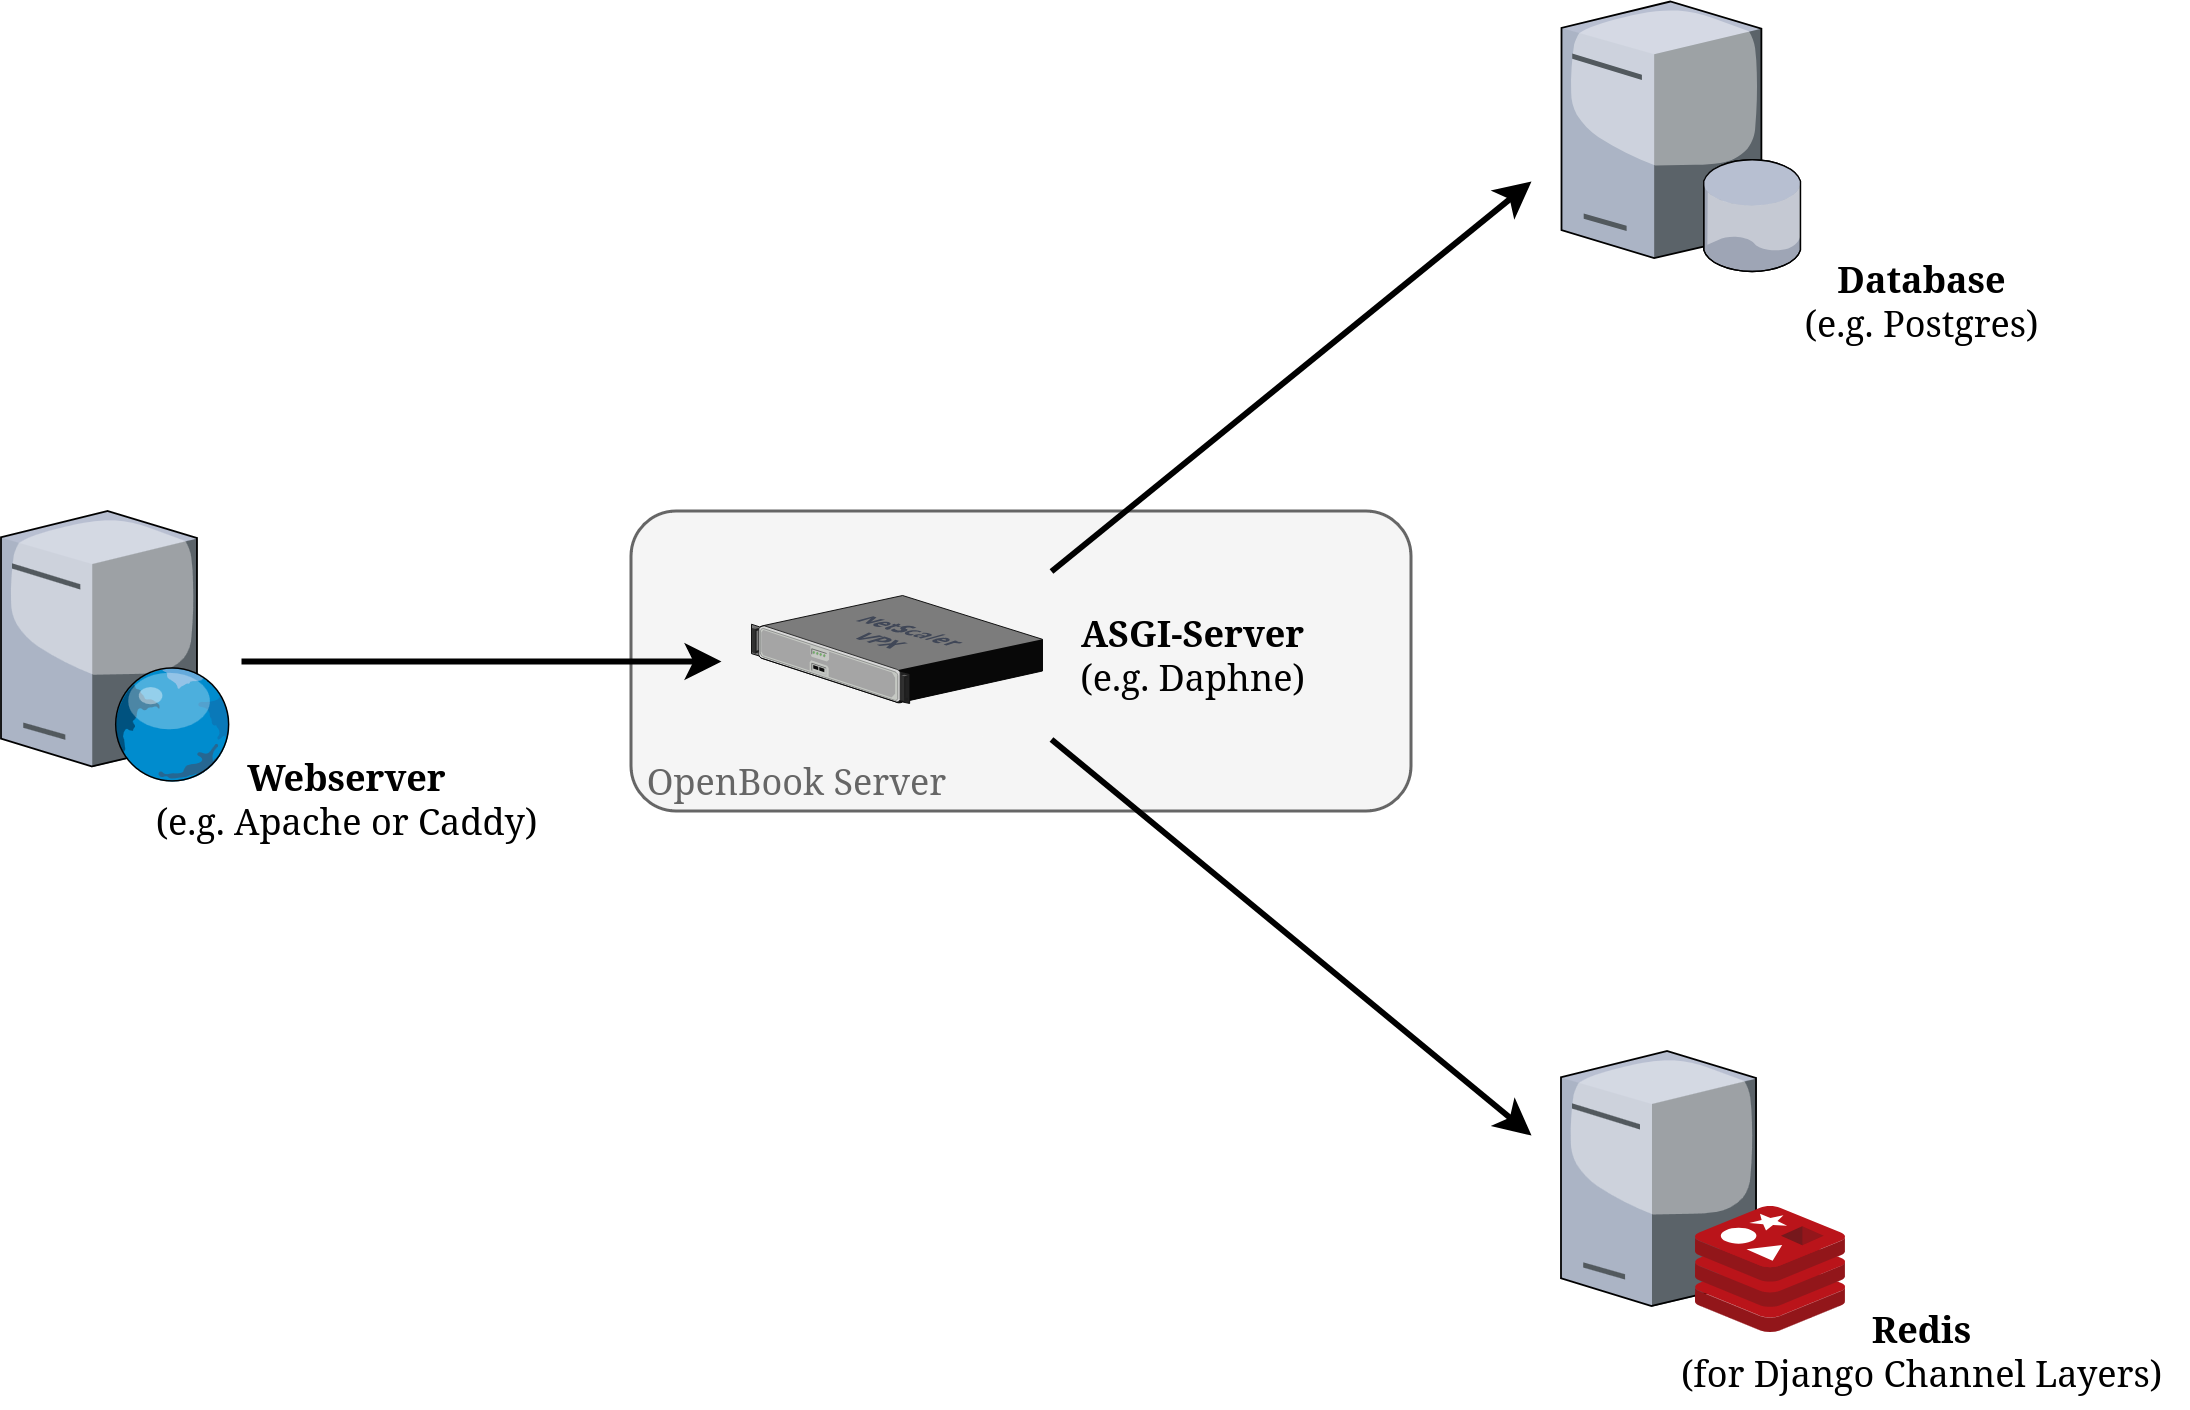
OpenBook deployment architecture and component boundaries.
The deployment can stay simple at first. A single machine can host the reverse proxy, the ASGI application, the database, and optional supporting services. If the reverse proxy can distribute traffic across several backend processes, the same layout also scales to multiple application instances later.
Front Web Server – A front web server is not strictly required, but it is the usual choice for TLS termination, static file delivery, uploaded media delivery, and reverse proxying to the Django application. In a small installation, one machine often serves all of these roles. In a larger installation, static files, media files, and the application can be separated across domains or machines. Apache HTTP Server remains a common production choice, while Caddy is a good modern alternative with minimal configuration.
# this can go in either server config, virtual host, directory or .htaccess
WSGIPassAuthorization On
ASGI Server – The core application runs through an ASGI server. For Django projects this is commonly Daphne, which is already part of the project dependencies. A typical production command is:
daphne -p 8000 -b 0.0.0.0 openbook.asgi:application
Redis – OpenBook incroporates real-time features based on Django Channels and Celery. These
require a running Redis service to decouple the main web process from background and task runners.
While these can run on many different queues, Redis is the usual backend. The pre-defined Django
configuration expects Redis on localhost:6379 by default, although you can override that in
the local settings.
Database – OpenBook needs a SQL database for persistent storage. MariaDB and PostgreSQL are both suitable choices. Refer to the Django database documentation for supported backends, install the matching Python driver, and update the deployment settings accordingly.
Docker Compose
The docker/ directory contains a working Docker Compose example that you can use as a reference
deployment and as a starting point for your own environment. It is useful both for local deployment
tests and for understanding how the components fit together.
The most common Docker Compose commands are:
docker compose build to build the images
docker compose up to start the stack in the foreground
docker compose up -d to start the stack in the background
docker compose down to stop the stack
docker exec -it docker-openbook-server-1 sh to open a shell in the application container
The example setup defines the following services:
postgresin containerdocker-postgres-1for persistent database storageredisin containerdocker-redis-1for asynchronous processing supportopenbook-serverin containerdocker-openbook-server-1for the Django applicationwebserverin containerdocker-webserver-1for the front-facing reverse proxy
There is currently no official image on Docker Hub. The repository instead provides a Dockerfile
that Compose builds locally. The legacy deployment recommendation still applies: copy the
docker/ directory to a location outside the Git checkout and adapt it to your environment.
Manual Installation
This tutorial walks through a complete manual installation of OpenBook on a single Debian server. All components — the application, database, Redis, and the front web server — run on the same host. The steps can be adapted to other Debian-based distributions and, with small adjustments, to any system where the required packages are available. The following assumptions apply throughout:
The source code is downloaded from the GitHub release page or by cloning a release branch.
The Python environment lives under
/opt/openbookand is managed with Poetry.MariaDB or PostgreSQL is installed via the OS package manager.
Redis is installed via the OS package manager.
Background jobs run as cron tasks.
The application and all supporting processes start automatically via SystemD.
Two front web server options are covered: Apache with Certbot for Let’s Encrypt TLS, and Caddy, which handles certificate issuance and renewal automatically.
Note
Commands in this tutorial assume root access. Adapt sudo usage to your own privilege model. Steps that should run as the application user call that out explicitly.
Prerequisites
Before you begin, make sure the Debian server meets the following preconditions:
A public IP address with DNS pointing to the server’s hostname.
Ports 80 and 443 reachable from the internet (required for Let’s Encrypt).
Root access or a user with sudo privileges.
API keys and addresses for at least one LLM provider (Mistral, OpenAPI, …)
Install base system packages. The list covers Python 3.x, the native libraries required for SAML support, Redis, and a database server. Choose MariaDB or PostgreSQL based on your preference:
apt-get update
apt-get install -y \
    python3 python3-venv python3-poetry \
    git \
    xmlsec1 libxmlsec1-dev libltdl-dev \
    redis-server \
    mariadb-server default-libmysqlclient-dev
Note
To use PostgreSQL instead of MariaDB, install postgresql and libpq-dev in place of
the MariaDB packages. The database driver step later in this tutorial covers both options.
System User and Application Directory
Running the application as a dedicated non-root user limits the impact of any application-level security issue. Create the user and the directory that will hold both the source code and the Python environment:
useradd --system --shell /usr/sbin/nologin --home-dir /opt/openbook openbook
mkdir -p /opt/openbook
chown openbook:openbook /opt/openbook
Download the Source Code
Download the latest release archive from the GitHub releases page. Each release attaches a source
archive named openbook-x.y.z-source.tar.gz — replace x.y.z with the actual version
number. You can download it manually from the browser, or fetch it directly on the server:
# Option A: release archive (downloaded with wget)
cd /opt/openbook
wget https://github.com/openbook-education/openbook/releases/download/vx.y.z/openbook-x.y.z-source.tar.gz
tar -xzf openbook-x.y.z-source.tar.gz --strip-components=1
rm openbook-x.y.z-source.tar.gz

# Option B: Git clone of a release branch
git clone --branch release/x.y.z https://github.com/openbook-education/openbook.git /opt/openbook
Note
We recommend cloning the release branch. This greatly simplifies installation of patches and upgrading to newer versions.
After extracting or cloning, restore the correct ownership:
chown -R openbook:openbook /opt/openbook
Set Up the Python Environment
Configure Poetry to create the virtual environment inside the project directory. This gives the SystemD unit files a stable, predictable path to the Python interpreter:
su -s /bin/bash openbook -c "
    cd /opt/openbook &&
    poetry config virtualenvs.in-project true &&
    poetry install --without dev,docs
"
Poetry creates the virtual environment at /opt/openbook/.venv. Next, install the database
driver that matches your chosen database server. For PostgreSQL:
su -s /bin/bash openbook -c "cd /opt/openbook && .venv/bin/pip install psycopg"
For MariaDB:
su -s /bin/bash openbook -c "cd /opt/openbook && .venv/bin/pip install mysqlclient"
Note
If the installation fails with errors mentioning xmlsec or lxml, see
OS Dependencies (xmlsec1, ltdl) for resolution steps.
Configure the Application
Deployment-specific settings are separated from the shared codebase through a local settings
file. Copy /opt/openbook/src/local_settings.py.template to
/opt/openbook/src/local_settings.py and populate it with values appropriate for your
installation. It should look similar to the snippet below. Adapt the database engine, hostname,
credentials, and timezone to match your environment:
# /opt/openbook/src/local_settings.py

SECRET_KEY = "replace-with-a-strong-random-value"
DEBUG = False
ALLOWED_HOSTS = ["openbook.example.com"]

DATABASES = {
    "default": {
        "ENGINE": "django.db.backends.postgresql",  # or django.db.backends.mysql
        "NAME": "openbook",
        "USER": "openbook",
        "PASSWORD": "strong-database-password",
        "HOST": "localhost",
        "PORT": "5432",  # 3306 for MariaDB
    }
}

CHANNEL_LAYERS = {
    "default": {
        "BACKEND": "channels_redis.core.RedisChannelLayer",
        "CONFIG": {
            "hosts": [("localhost", 6379)],
        },
    },
}

# TODO: LLM API credentials

STATIC_ROOT = "/opt/openbook/src/_static"
STATIC_URL = "/static/"
MEDIA_ROOT = "/opt/openbook/src/_media"
MEDIA_URL = "/media/"

USE_TZ = True
TIME_ZONE = "Europe/Berlin"
SITE_ID = 1
Generate a strong value for SECRET_KEY with Python:
python3 -c "import secrets; print(secrets.token_urlsafe(50))"
Paste the output into the settings file, then restrict the file’s permissions so that other system users cannot read the credentials:
chown openbook:openbook /opt/openbook/src/local_settings.py
chmod 640 /opt/openbook/src/local_settings.py
Important
Always use your local copy of local_settings.py.template file as a starting point.
Always update the secret key with a strong random value to reduce the risk of signed-cookie tampering, forged sessions, and CSRF token abuse. Never reuse the same key across environments.
Prepare the Database
Create a dedicated database and user for OpenBook. The commands below cover MariaDB and PostgreSQL.
For MariaDB:
mariadb -u root <<EOF
CREATE USER 'openbook'@'localhost' IDENTIFIED BY 'strong-database-password';
CREATE DATABASE openbook CHARACTER SET utf8mb4 COLLATE utf8mb4_unicode_ci;
GRANT ALL PRIVILEGES ON openbook.* TO 'openbook'@'localhost';
FLUSH PRIVILEGES;
EOF
For PostgreSQL:
sudo -u postgres psql <<EOF
CREATE USER openbook WITH PASSWORD 'strong-database-password';
CREATE DATABASE openbook OWNER openbook;
EOF
Note
You can run the same command as above to generate a strong password:
python3 -c "import secrets; print(secrets.token_urlsafe(50))"
Next, run the Django migrations to create all tables:
su -s /bin/bash openbook -c "
    cd /opt/openbook/src &&
    ../.venv/bin/python manage.py migrate
"
Load initial data:
su -s /bin/bash openbook -c "
    cd /opt/openbook/src &&
    ../.venv/bin/python manage.py load_initial_data
"
Create superuser (admin user):
su -s /bin/bash openbook -c "
    cd /opt/openbook/src &&
    ../.venv/bin/python manage.py createsuperuser
"
Collect Static Files
Django collects all static assets into a single directory so the web server can serve them directly. Run this command once now, and again after every application update:
su -s /bin/bash openbook -c "
    cd /opt/openbook/src &&
    ../.venv/bin/python manage.py collectstatic --no-input
"
Create the media directory that Django uses for uploaded files:
mkdir -p /opt/openbook/src/_media
chown openbook:openbook /opt/openbook/src/_media
SystemD Services
Three processes need to run continuously: the Daphne ASGI server, the Channels background worker, and Redis. Redis runs as a standard OS service. Create SystemD unit files for the application processes.
Create /etc/systemd/system/openbook.service:
[Unit]
Description=OpenBook ASGI Server (Daphne)
After=network.target redis.service

[Service]
User=openbook
Group=openbook
WorkingDirectory=/opt/openbook/src
ExecStart=/opt/openbook/.venv/bin/daphne -p 8000 openbook.asgi:application
Restart=on-failure
RestartSec=5

[Install]
WantedBy=multi-user.target
Create /etc/systemd/system/openbook-worker.service:
[Unit]
Description=OpenBook Background Worker
After=network.target redis.service

[Service]
User=openbook
Group=openbook
WorkingDirectory=/opt/openbook/src
ExecStart=/opt/openbook/.venv/bin/python manage.py runworker default
Restart=on-failure
RestartSec=5

[Install]
WantedBy=multi-user.target
Note
The source tree contains two template files you can copy and adapt. Instead of directly
creating the files inside /etc/systemd/system/ you can symlink them from the
OpenBook source directory.
Enable and start all services:
systemctl daemon-reload
systemctl enable --now redis openbook openbook-worker
Verify that all three services are active:
systemctl status redis openbook openbook-worker
Front Web Server
Almost any web server can be used as a front web server for OpenBook, provided it can proxy HTTP and WebSocket connections. Its main tasks are to terminate TLS, serve static files, and proxy all other connections to the OpenBook backend server.
Caddy is a modern and performant alternative to traditional Apache web server setups. Advantages are increased throughput, simpler configuration and automatic provisioning of Let’s Encrypt certificates without any additional tooling.
See also
See the next section, if you prefer Apache.
Install Caddy directly from the Debian package repository:
apt-get install -y caddy
Replace the default /etc/caddy/Caddyfile with the following:
openbook.example.com {
   # Serve static and uploaded media files directly:
   handle /static/* {
      root * /opt/openbook/src
      file_server
   }
   handle /media/* {
      root * /opt/openbook/src
      file_server
   }

   # Proxy all other requests to Daphne:
   handle {
      reverse_proxy localhost:8000
   }
}
Enable and start Caddy:
systemctl enable --now caddy
Caddy detects the configured hostname, requests a certificate from Let’s Encrypt on first startup, and schedules automatic renewal. No further TLS configuration is required.
OpenBook runs perfectly fine with the traditional Apache web server. If you prefer this option over Caddy, install Apache and the Certbot plugin with the following commands.
apt-get install -y apache2 certbot python3-certbot-apache
a2enmod proxy proxy_http proxy_wstunnel headers ssl rewrite
Next, create a virtual host configuration in
/etc/apache2/sites-available/openbook.conf:
<VirtualHost *:80>
   ServerName openbook.example.com
   RewriteEngine On
   RewriteRule ^ https://%{HTTP_HOST}%{REQUEST_URI} [L,R=301]
</VirtualHost>

<VirtualHost *:443>
   ServerName openbook.example.com
   SSLEngine On
   # Certbot fills in the certificate paths after issuance.

   # Serve static and uploaded media files directly:
   Alias /static/ /opt/openbook/src/_static/
   Alias /media/  /opt/openbook/src/_media/
   <Directory /opt/openbook/src/_static>
      Require all granted
   </Directory>
   <Directory /opt/openbook/src/_media>
      Require all granted
   </Directory>

   # WebSocket upgrade for Django Channels:
   RewriteEngine On
   RewriteCond %{HTTP:Upgrade} websocket [NC]
   RewriteRule /(.*) ws://127.0.0.1:8000/$1 [P,L]

   # Reverse proxy all other requests to Daphne:
   ProxyPreserveHost On
   ProxyPass /static/ !
   ProxyPass /media/  !
   ProxyPass / http://127.0.0.1:8000/
   ProxyPassReverse / http://127.0.0.1:8000/
</VirtualHost>
Enable the site and obtain a Let’s Encrypt certificate:
a2ensite openbook
systemctl reload apache2
certbot --apache -d openbook.example.com
Certbot writes the certificate paths into the virtual host and reloads Apache automatically. Renewal runs via a pre-installed systemd timer and requires no additional configuration.
Periodic Maintenance With Cron
A few Django management commands should run on a regular schedule to keep the deployment clean.
Add the following entries to the openbook user’s crontab:
crontab -u openbook -e
Append these lines to the crontab:
# Remove expired sessions every night at 02:00
0 2 * * * cd /opt/openbook/src && /opt/openbook/.venv/bin/python manage.py clearsessions

# Remove stale content types every night at 02:15
15 2 * * * cd /opt/openbook/src && /opt/openbook/.venv/bin/python manage.py remove_stale_contenttypes --no-input

# Daily database backup at 03:00
0 3 * * * cd /opt/openbook/src && /opt/openbook/.venv/bin/python manage.py dbbackup
See also
Periodic Jobs and Backup Commands list all available management commands and backup configuration options.
Final Testing
After the deployment is complete, verify that the full stack works end to end before handing the system over to users.
Start with service health checks on the server:
systemctl status redis openbook openbook-worker
systemctl status caddy   # or: systemctl status apache2
All units should be in active (running) state.
Then open the OpenBook URL in a browser (for example https://openbook.example.com) and test
the most important paths:
The landing page loads without a 5xx error.
/api/responds through the reverse proxy.Static assets (CSS/JS) are loaded correctly.
Uploaded media files are reachable when opened directly.
Next, sign in with the superuser account created earlier and validate core administrative actions:
Open the Django admin and verify that model lists render.
Create and save a small test object.
Trigger one action that creates a background task and confirm no worker errors appear.
While testing, keep an eye on logs in a second terminal:
journalctl -u openbook -u openbook-worker -u redis -f
journalctl -u caddy -f   # or: journalctl -u apache2 -f
If pages load, login works, and no recurring errors appear in the logs, the installation is ready for production traffic.
Congratulations
You made it until the end. Your OpenBook installation should now be ready. Join our community to learn about new features and updates as well as to share your experiences.
Troubleshooting
OS Dependencies (xmlsec1, ltdl)
Before you install Python dependencies with poetry install, make sure the required system packages for SAML support are present. On Linux, install them through your distribution package manager.
xmlsec1including development headerslibtool-ltdlincluding development headers
These packages are required for SAML integration. If you do not plan to use SAML and cannot install
them, you can edit pyproject.toml and remove "saml" from the django-allauth dependency
extras.
If the server later crashes with xmlsec.InternalError: (-1, 'lxml & xmlsec libxml2 library
version mismatch'), the cause is usually one of the following:
The system has multiple
libxml2versions installed.lxmlandxmlsecwere compiled against differentlibxml2versions.libxml2,lxml, orxmlsecchanged without rebuilding the others.Poetry installed binary wheels that do not match the system libraries.
In many cases, reinstalling both packages from source resolves the mismatch:: In many cases, reinstalling both packages from source resolves the mismatch:
poetry run pip uninstall lxml xmlsec -y
poetry run pip install --no-binary=:all: lxml xmlsec
Local Django Settings
Deployment-specific configuration is separated from the shared Django settings through a local override file. This keeps must-have settings, required to run OpenBook at all, in version control while defining a clear place for database connections, credentials and other site-specific settings.
File |
User Changeable |
Content |
|---|---|---|
|
No |
Core Django settings |
|
Yes |
Installation-specific settings, e.g. database connections |
The local_settings.py file is therefore excluded from version control. A template file in the
repository documents the settings that administrators commonly need to adjust.
WSGI vs. ASGI
Traditional WSGI deployments with Apache and mod_python are not sufficient here because OpenBook also relies on Django Channels and therefore expects an ASGI-capable application server. Daphne is already included, so the basic startup command is straightforward.
To start the application and listen on all interfaces:: To start the application and listen on all interfaces:
cd src
daphne -p 8000 -b 0.0.0.0 openbook.asgi:application
On a local workstation you may need to run Daphne through Poetry so it uses the project virtual environment.
If the application sits behind a reverse proxy on the same host, bind it to localhost instead:
cd src
daphne -p 8000 openbook.asgi:application
If you still need a reverse proxy, Caddy is a practical option.
Do not forget static and uploaded media files. By default, OpenBook stores them in _static/ and
_media/ within the Django project, although the file system paths and public URLs can be
overridden in local_settings.py. After changing static asset settings, collect the files before
serving them:
python ./manage.py collectstatic
Periodic Jobs
OpenBook includes Django management commands that should run periodically to keep the deployment clean and predictable. In practice you would call them through cron, a systemd timer, or another job scheduler.
The commands are typically run from the Django project directory:: The commands are typically run from the Django project directory:
./manage.py command --options
The most important periodic tasks are listed below.
Management Command |
Description |
|---|---|
clearsessions |
Removes expired sessions from the database. |
remove_stale_contenttypes --no-input |
Removes stale content types for non-existing models. |
Backup Commands
OpenBook includes Django DBBackups for database and media backups. Backups can be written to local storage or to remote destinations such as S3 or Dropbox. The upstream project documentation covers the full configuration model. The table below summarizes the commands that administrators use most often.
Management Command |
Description |
|---|---|
dbbackup |
Creates a new database backup. |
dbrestore |
Restores a database backup into an empty database. |
listbackups |
Lists the available backups. |
mediabackup |
Creates a backup of uploaded media files. |
mediarestore |
Restores uploaded media files from backup storage. |
The target database should be empty before you restore a backup. For larger installations, the DBBackups documentation recommends creating backups from a database replica to reduce load on the primary database server.